Enhanced Conversions Guide
Setting Up Enhanced Conversions Using Google Tag Manager Guide
Step one: Preparation
Firstly we are going to go through and make sure we are eligible for enhanced conversions, the below list is all the requirements you will need to set up enhanced conversions
Pre-implementation Requirements:
- Conversion Page – URL Identify the URL where the conversion tag will fire.
- GTM is on the site – Make sure the code for GTM is in the source code of your site
- First-Party Customer Data – Ensure there is at least 1 (The more the better) set of first-party customer data available on the page where your conversion tracking tag fires. This includes
- Email ( Recommended )
- Phone Number: ( Recommended to provide it along with an email for optimal matching )
- Address: ( If used, ensure you include first name, last name, postal code, and country. If any of these details are missing, do not include the address. )
Figure out which tag to use inside Google Tag Manager:
Before we begin, we must first figure out which tag we are going to pick to use inside tag manager, there are two options depending on where on the site the customer’s first-party data is collected.
1. Google Ads Conversion Tracking:
When to Use It: Use this option when the customer’s first-party data (like email or phone number) is collected on the same page where the conversion tag fires. This typically happens on a confirmation page where the user completes a purchase, on a form submission, or other conversion action, and their details are present on the same page.
2. User-Provided Data Tag:
When to Use It Use this option when the customer’s first-party data is collected on an earlier page (e.g., during the checkout or form fill stage), and the confirmation page (where the tag fires) doesn’t contain the customer’s data. This tag allows you to pass the previously collected data (from a prior page) when the confirmation page fires the tag.
This guide is going to be showing the set up procedure for option 1 – Google Ads Conversion Tracking Tag
If you are in need of option 2 installation, please follow this guide which has the setup for Option 2 User-Provided Data Tag:
SOP: User-Provided Data Event Edition
You want to end up with a list similar to this
Conversion Type – Contact Form submission
URL – https://www.example.com/page/
Tag Type – Google Ads Conversion Tracking Tag
First Party Data – Yes:
Email – Yes/No
Phone number – Yes/No
Address – All below must be yes to be valid
– First Name – Yes/No
– Last Name – Yes/No
– Post Code – Yes/No
– Country – Yes/No
Step 2: Configuring Google Ads For Enhanced Conversions
The next steps are going to show you how we set up the google ads account ready for the enhanced conversions.
Google Ads Account Settings Config
Preparing Our New Conversions Inside Google Ads
- Goals > Summary > Create Conversion Action.
- Select “Website” > Enter URL >
- Select ‘Google Ads only’ if it appears, as this option may show based on previous account settings. If it doesn’t appear, no action is needed.
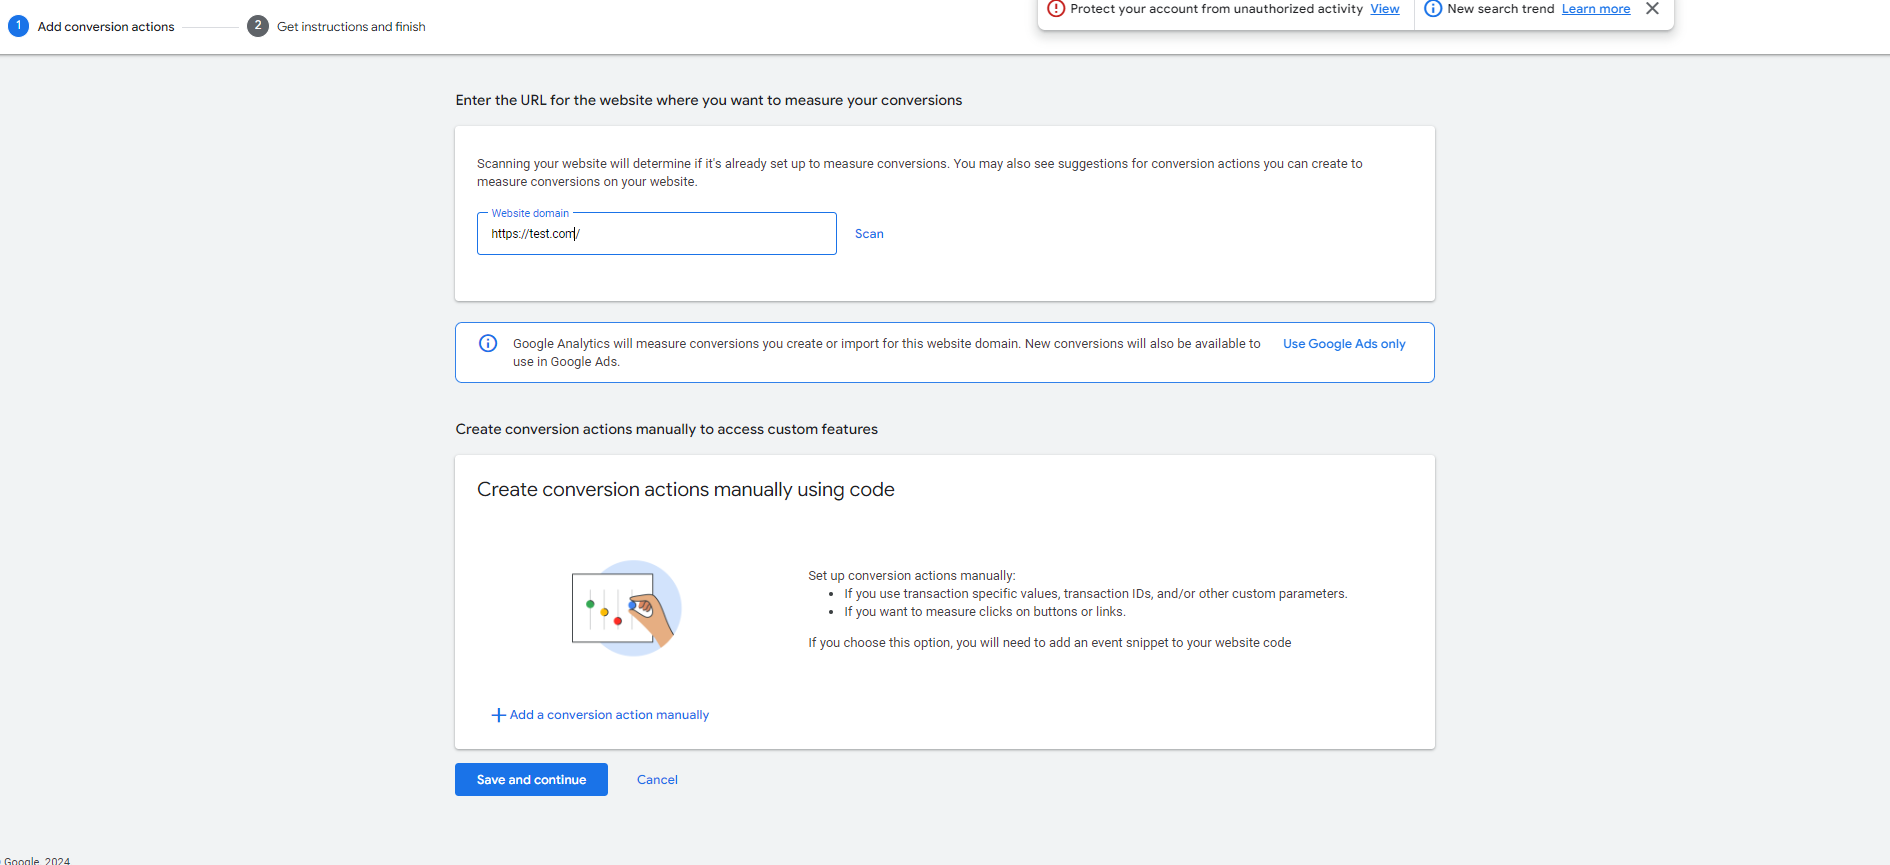
- Select “Add a conversion action manually.”
- Fill in details (ensure Enhanced Conversions via Tag Manager is enabled).
- For multiple actions, repeat steps 6-7.
- Save & continue.
- Use Google Tag Manager > Copy Conversion ID & Labels to Notepad.
You should have something similar to this
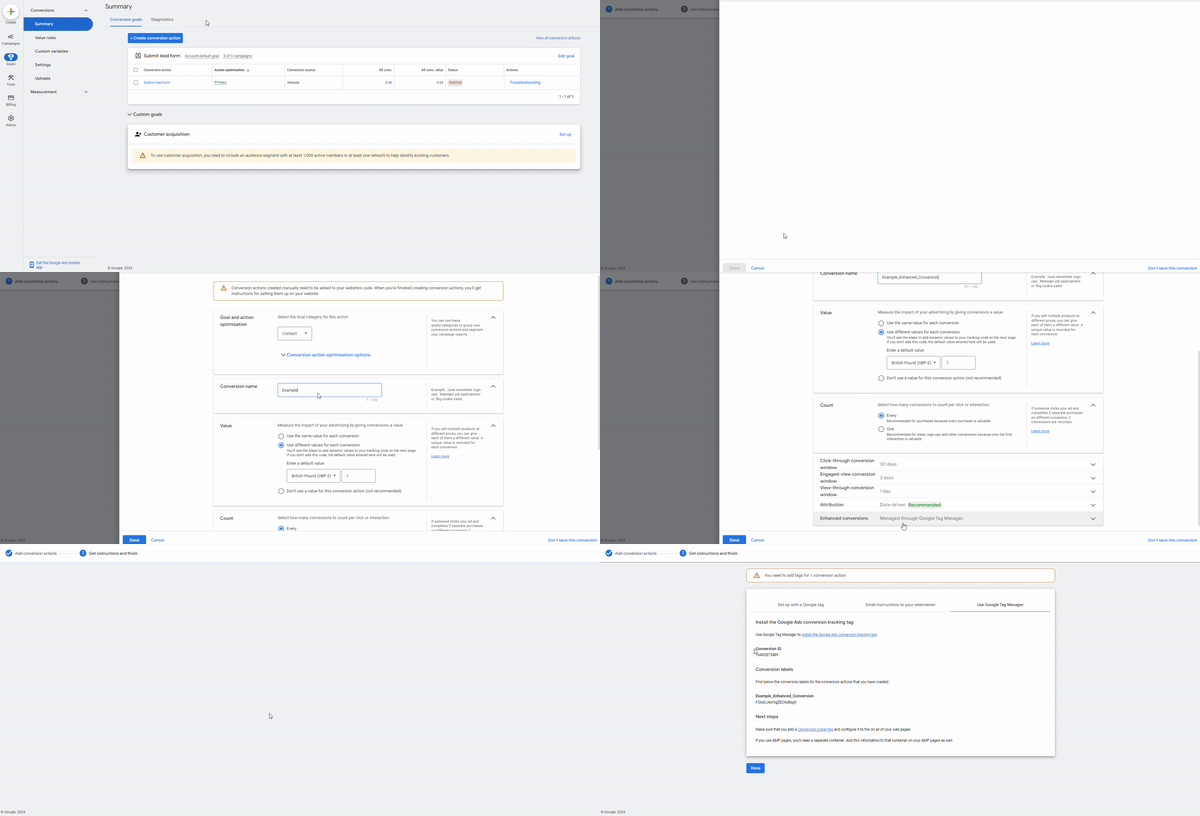
After this We are finished inside Google Ads, now we do the rest of the set-up inside Google tag Manager
Step 3: Setting Up The Enhanced Conversions Inside Tag Manager Using Javascript CSS Selector
This guide is going to be showing the set-up procedure for option 1 – Google Ads Conversion Tracking Tag
If you are in need of option 2 installation, please follow this guide which has the setup for Option 2 User-Provided Data Tag:
SOP: User-Provided Data Event Edition
It is recommended to use google chrome to help with the setup
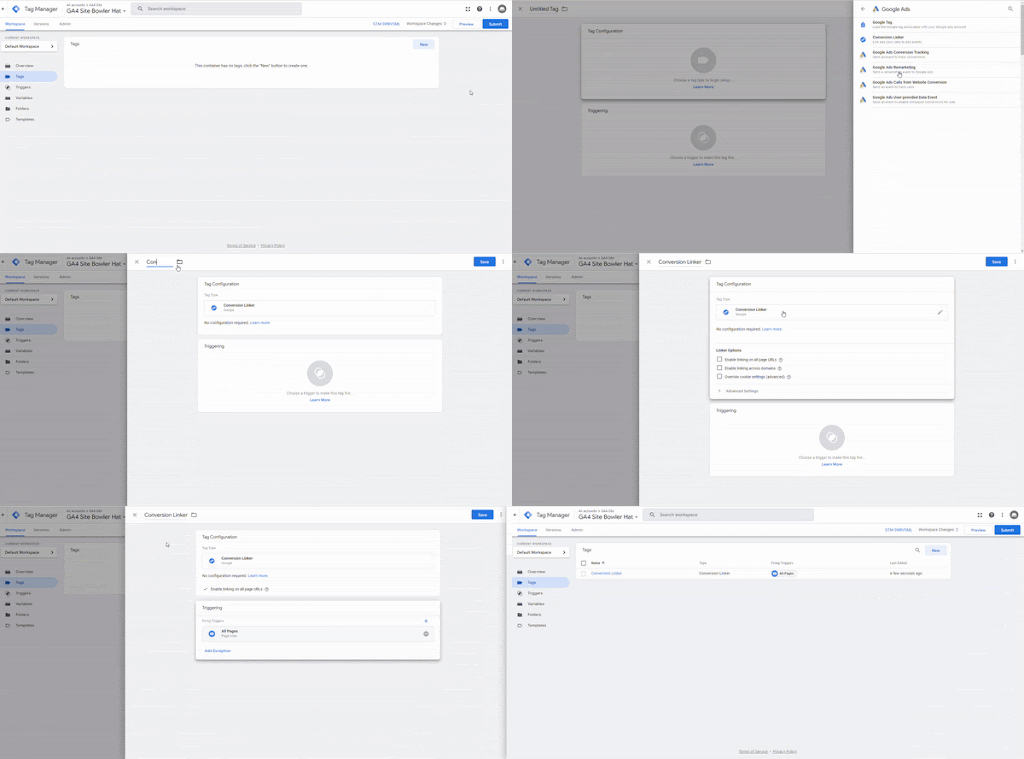
- Ensure a Conversion Linker Tag is present.
- Make Sure – Enable linking on all page URLs is ticked
- If one not present create one
- New Tag > Conversion Linker > “Name the Tag Conversion Linker”
- Enable linking on all page URLs
- Trigger > All Pages
- Save
2. Create a new tag:
- Tag Type: Google Ads Conversion Tracking.
- Name the tag: e.g., “Enhanced_Contact_Form.”
- Enter Conversion ID & Label from previous step’s.
- Save the tag ( We will return back later ).
3. Create a Trigger:
- Name the trigger.
- Trigger config > Form Submission > Some Forms.
- Change “Click Classes” to “Page URL” > Equals/contains > paste the url your form is on
- For forms on multiple pages + other forms on site aswell, refer to bottom of SOP for the slight difference in trigger set up.
- Save the trigger.
4. Determine customer data to track and go to URL:
- Email (minimum), Email + Phone (recommended), or Email + Phone + Address ( full package).
- For address, First name, last name, postcode, and country are all required together, If any of these details are missing, do not include the address
- Make sure the URL with the information on is open on another tab
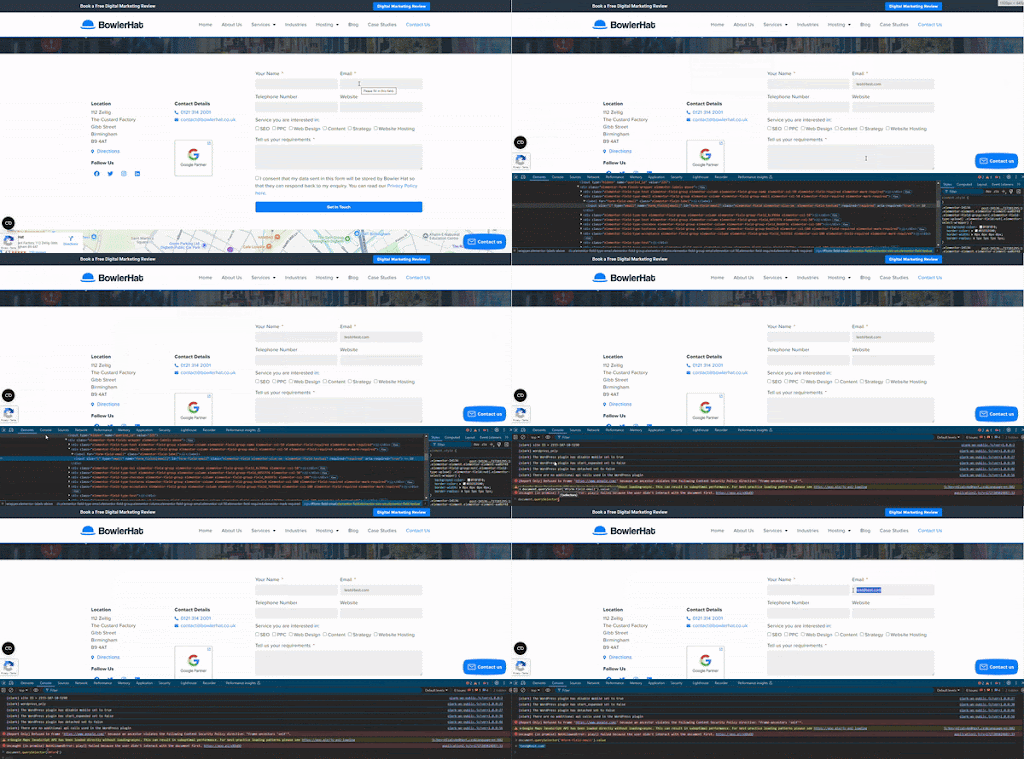
5. Getting the CSS selector from your site:
- ( We are doing the email address in the below example, same process for the others )
- Right-click the email field on the site > Inspect > Copy > Copy selector.
- Paste inside a notedoc ( You’re not allowed to paste for the next step on google chrome )
- In Chrome Dev Tools > console, test the selector by going to console and using: document.querySelector(‘CHANGE TO YOUR SELECTOR’).value
- Confirm it works by checking the returned email after entering it.
6. Go to Tag Manager > Variables:
- Name the variable “Email”
- Create new user-defined variables > Custom JavaScript.
Paste this code:
function(){
return document.querySelector(‘CHANGE TO YOUR SELECTOR’).value
}
- Repeat for Phone and Address ( if available, if not skip to next ).
7. Go back to the saved tag:
- Tick “Include user-provided data from your website.”
- Create a new variable, name it e.g., “Enhanced Manual.”
- Match parameters to the variables we just created.
- Add the trigger we created before
Testing
- Preview your site in tag manager
- In the debug window fill in the form and submit
- Check the tag assistant screen and find where the conversion took place
- Click values
- Scroll down to find the parameters we made
- The Value should match the data you provided
- If it is, it all works good job
Not Working? Common Problems and How to Fix Them
1. No Form Submission Event Detected
It’s common to encounter situations where, after a form is submitted, Google Tag Manager (GTM) doesn’t detect the submission, preventing the trigger from firing properly.
Example
One frequent issue is with Elementor forms, which often do not generate an event in Google Tag Manager. If you’re using an Elementor form on your site, this could be why the form submission isn’t triggering the event.
Our Recommended Solution
- To resolve this issue, you will need help from your developers to ensure the form submission event is pushed to the GTM data layer. They can add the following code to trigger the event whenever the form is successfully submitted:
<script>
window.dataLayer.push({
‘event’ : ‘formSubmit.Success’
})
</script>
- Alternatively, if this issue persists, consider switching to Contact Form 7, which has built-in support for Google Tag Manager. You can find more details and download it here: Contact Form 7.
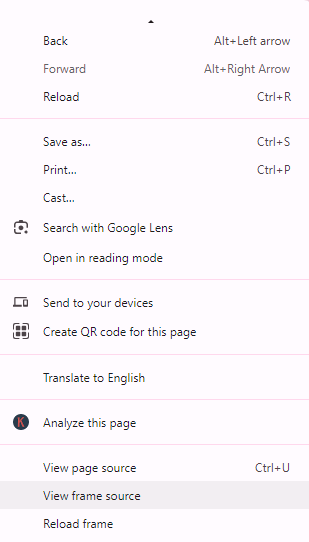
2. Form Embedded in an iFrame
Another common challenge is when the form is embedded on your website using an iFrame. Since an iFrame is technically a separate window embedded on your site, GTM is unable to track activity inside it. Think of an iFrame as a “black hole” for GTM—it cannot detect events happening within it.
How to Check if Your Form is an iFrame:
- Right-click on the form and inspect it.
- Look for the option to “View Frame Source” or check the HTML structure for an <iframe> tag.
Our Recommended Solution
iFrames are tricky because they essentially act as independent websites. There are two main options for resolving this issue:
- Contact the iFrame provider (the external site that hosts the form) and request that they insert your Google Tag Manager code within the embedded form. This would allow GTM to track form submissions within the iFrame.
- Consult your web developers to see if it’s possible to replace the iFrame with a form that resides directly on your website. This would give you full control over tracking and eliminate the issue.
Keep in mind that both solutions may require collaboration with external teams and could involve some pushback, as these changes might not be straightforward. However, if accurate conversion tracking is essential for your business, it’s worth pursuing.
- 112 Zellig
- The Custard Factory
- Gibb Street
- Birmingham
- B9 4AT


