If you’ve ever tried to optimise your WordPress website for SEO, you’ve surely heard of the Yoast SEO plugin. Yoast SEO is arguably the best plugin available for improving your SEO performance on WordPress and has over 1 million active installs.
Once you install the Yoast SEO plugin on your WordPress website, the plugin will automatically improve some areas of your website upon installation, such as changing your homepage so that it doesn’t have “Just Another WordPress Site” in its page title, and creating a sitemap for your website. However, I recommend manually checking some of the configurations of the plugin to make sure that you can use it to its full potential.
1. Enable Advanced Settings Pages in the Yoast Dashboard
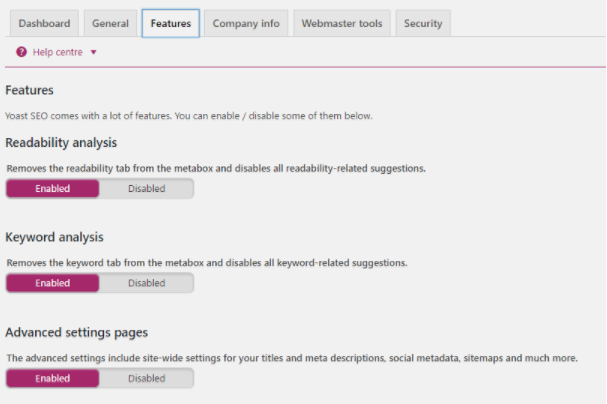
When you first install Yoast, you may find there isn’t much to customise. This is because advanced settings are turned off by default. When you first install Yoast, the first thing you should do is make sure advanced settings is turned on, so that you can see all the settings you may need to configure. Below is a screenshot of how it should look, so “Advanced settings pages” is set to “Enabled”:

You need to do this before you do any of the following configurations, otherwise you won’t be able to see them.
2 . Ensure That the Sitemap Yoast Uses Is Working Correctly
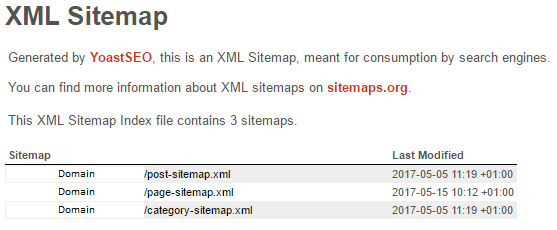
Yoast will try to automatically create a sitemap for you upon installation, although you should check that it has actually created it. When installing the plugin, it will try to create a sitemap on the URL /sitemap_index.xml of your website.
When you install the plugin, you should try to visit this page to see if the sitemap has been installed correctly. If the page brings up a white page with the title “XML Sitemap” at the top and has the sitemap below, then great, move ahead to the next configuration. It should look something like this:

If it hasn’t worked and you instead see your “404 Error” page, you may need to go to the “XML Sitemaps” page in the Yoast SEO plugin settings. At the top, you should see the “XML sitemap functionality” and a switch where you can change it from “Enabled” to “Disabled”. If it is on “Enabled”, change it to “Disabled” and save the page. Then, change it back from “Disabled” to “Enabled”, save the page again, and check if the 404 page has turned into your sitemap. If this still hasn’t worked, you may need to check whether you have a plugin that is conflicting with Yoast SEO and stopping you from creating a sitemap.
Once your sitemap is working, you may want to configure the taxonomies of the sitemap so that Google isn’t crawling parts of your site that aren’t needed. You can edit your taxonomies by clicking to the “Taxonomies” tab.
Personally, I configure this section so that the only taxonomies indexed are categories and post tags, as anything else is not likely needed to be crawled by Google. Depending on what theme you are using, you may have a large number of taxonomies, but I recommend only having categories and post tags included in the sitemap.
3. Configure Your Page Title Structure
Although I recommend setting each page title manually, you may want to edit the template Yoast uses for page titles. When installed, Yoast will change the page title structure to “[Title of Page] [Separator] [Name of Site]”, so if the title of the page is “About Us”, and the name of your website is “Mike’s Motorbikes”, then the page title will look like “About Us – Mike’s Motorbikes”.
First of all, you should check that the name of the site is correct, if not, this can be changed by going to “Yoast SEO Dashboard > Your Info”, and then changing the website name so that it is correct. This should then change all of the page titles so that they now display the correct site name.
Secondly, you may want to change the separator of your page title. The default separator is a dash (-), but you can change it to another symbol, such as a pipe (|) or a tilde (~). This doesn’t have an effect on SEO, it is just for personal preference.
As I mentioned before, I recommend going through each page title manually, but if you have a large website it could save you time from having to go through hundreds of pages and posts.
4. Verify Google Search Console Through Yoast
If you haven’t already done so through the methods Google offers, you can set up Search Console in Yoast. When you create a new property in Search Console, you will then choose to verify your site by using an HTML tag, which will look like this:
<meta name=”google-site-verification” content=”[unique-tag]”>
Search Console will ask you to put this tag into the head of your website so it can be found on every page. Instead, you can put it into the “Search Console” section in the Yoast Dashboard, which will add this into the head for you.
Once you have done this and verified it has worked, you can then view your site performance in Google Search Console.
5. Allow Yoast SEO to Gather Information From Google Search Console
Once you’ve got Google Search Console working, you can also allow Yoast to read any issues that may have appeared in Search Console, and display them in the Search Console page of Yoast’s settings.
If you do not check Google Search Console often, this may prove useful so that it is harder to miss any issues that may have risen.
To do this, go to the “Search Console” page in Yoast SEO settings, and you should see a button saying “Get Google Authorisation Code”. Before you click this, make sure that you are logged into the Google account that has the website verified in Search Console. Once you click the button, you should go to a page asking for Yoast SEO to view and manage Search Console data. Click “Allow”. It should then display a unique code, which you should copy and paste into the box back in the Yoast SEO settings page, and click “Authenticate”. This should then allow Yoast SEO to display any issues that may have arisen in Google Search Console.
6. Set Up Your Social Profiles in Yoast
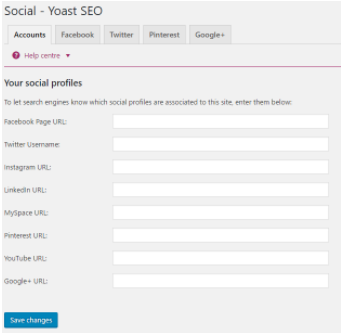
You can also set up your social profiles in Yoast so that search engines know they are associated with your website. This can be easily done by going to the “Social” page in the Yoast SEO plugin settings, and simply pasting the details of each social platform you use into each designated box:

You’ll notice that Twitter is the only box that doesn’t ask for a URL, and instead asks for your Twitter username instead, so be sure to paste that into the box instead to make sure it works.
Conclusion
Even though these configurations are minor, they could have a positive impact on SEO, so it is worth going through the settings for Yoast and making sure that they are configured correctly. If you want more information about configuring your website, check out our Small Business Website Guide or if you’d like to gain some more SEO tips, then sift through our blog and see how we can help.


3 Responses
I need to install Yoast so badly! Thanks for this Andrew. What other SEO plugins can you recommend in WordPress?
Hey. Anything that speeds the site up can be useful. Smush for images. WP Cache for overall site speed. In a way you don’t want too many plugins as it can bloat and slow down your site but certainly, these ones are a win.
Great post, Yoast is by far my favourite Seo plugin.