Google Ads Enhanced Conversions – The Ultimate Guide

Simply put, Enhanced Conversions are a tracking method that helps fill gaps in your conversion data created by modern privacy standards like GDPR. They work by securely sending hashed (encrypted) customer data (such as email addresses) to Google’s servers, where it’s matched to a user’s Google account. Once matched, Google attributes the conversion directly to your Google Ads account, enhancing your conversion tracking without relying on cookies.

There are a few important requirements for using enhanced conversions:

  • Google Ads integration:  Enhanced Conversions are available exclusively within Google Ads.
  • End User’s Google account:  Enhanced Conversions work best when the user has a Google account, but they can still track conversions even if the user doesn’t, though match rates may be lower.
  • Personal information required: Enhanced Conversions can only track actions where users input personal information, such as filling out a form.

At a time when ad platforms are increasingly leveraging AI and signals to refine campaigns, Enhanced Conversions provides a privacy-compliant solution with strong conversion signals—a win-win for both conversion tracking and user privacy.

What Can we track with enhanced conversions?

Essentially enhanced conversions can be used anywhere the user will submit their information to your website.

Here are the most common examples of where you can use enhanced conversions:

  • Contact Form Submission
  • Newsletter Subscription
  • E-commerce tracking
  • Account Creations
  • Event Registration
  • In-App Conversions

What can’t be tracked with Enhanced Conversions?

Enhanced conversions require some identifiable information, so you can’t track things like button clicks, phone number clicks, email clicks, etc.

Who is this guide for?

Enhanced conversions are solely for Google Ads so any PPC or Analytics people should be at home. If you are on the SEO or Social side of things then you don’t have to worry about this for now (lucky you).  Further to that, readers should understand Google Analytics 4, Google Tag Manager, conversion tracking, and Google Ads. If you’re not familiar with these tools yet, don’t worry—you can check out our other guides to get you up to speed.

At first, setting up Enhanced Conversions may seem time-consuming and fiddly, but once you get the hang of it, you’ll find the process much smoother and quicker.

Remember, if you need any help, or just want to pick our brains – get in touch, we are always happy to help! 

How to use this guide

If this is your first rodeo then our recommendation would be to first read through the article to get an idea of how all of this hangs together along with the options.

Then, you can pick things up from Step One below and follow the setup steps.

Should I use Google Tag Manager (GTM) or Global Site Tag (gtag) for enhanced conversions?

There are two options how to set up enhanced conversions: Google Tag Manager (GTM) and Global Site Tag (gtag), the right option depends on your preferences and the complexity of your tracking needs (although we tend to favour GTM here at Bowler Hat).

1. Google Tag Manager (GTM)

Advantages of Using GTM for Enhanced Conversions:

  • Centralised Tag Management: GTM allows you to manage all your website’s tracking and marketing tags from a single interface. Especially useful if you have multiple tracking tools like Google Ads, Analytics, Facebook Pixel, etc.
  • No Developer Involvement: Once GTM is installed, marketers can manage and update tracking tags themselves without needing to involve developers each time a new tag is needed.
  • Event-Based Tracking: GTM offers more flexibility for tracking complex interactions like form submissions, button clicks, or other custom events that might trigger conversions.
  • Testing and Debugging: GTM has built-in preview and debug tools that allow you to see if your tags are firing correctly before publishing changes live.
  • Automatic Data Hashing: You just map the raw data, and GTM sends the hashed version to Google Ads.

When to Use GTM:

  • When you need flexibility: GTM is better if you have multiple conversion events to track (like form submissions, purchases, etc).
  • Control without coding: Edit tags and new conversions without needing to modify your site code directly each time you need to update your tracking setup.
  • Complex Event-Based Tracking: GTM is great for setting up complex, multi-step user journeys that require multiple event triggers or conditions.
  • Managing multiple tracking tags simultaneously: Great for managing multiple channels in one interface to avoid confusion

Example GTM Usage:

  • You want to track Enhanced Conversions for multiple events (form submissions, button clicks, and purchases) on a big website, and you need to simultaneously manage other tracking tags like Google Analytics and Facebook Pixel.

2. Global Site Tag (gtag)

Advantages of Using gtag for Enhanced Conversions:

  • Simple and Lightweight: If you only need to implement basic Google Ads and Google Analytics tracking and don’t require complex event-based tracking, gtag.js is a simple and direct solution.
  • Direct Control Over Tag Implementation: You manually place the code on your site, which may appeal to developers or websites with simple tagging needs.

Automatic: GTAG offers automatic data capture where Google will try to do much for you

When to Use gtag.js:

  • If you have a small site or limited tracking needs: gtag.js is ideal if you only need basic conversion tracking without the need for event-based or multi-platform tracking.
  • When you prefer via code: Developers or businesses who want more direct control over their code and tracking scripts may prefer gtag.js over using a tag management platform.
  • For simpler implementations: If you only need to track one or two types of conversions, gtag.js is faster to implement.

Example gtag.js Usage:

  • You have a small lead gen site where the only conversion you want to track is one form. You add gtag.js directly to your site and send Form Submission data (e.g., email or phone) for enhanced conversions.

Our recommendation:

We advise you to learn and use the tag manager implementation as there is more scope for your website’s tracking capabilities, even if you do not need them now. Changing from Gtag to GTM in the future can be more complicated than setting up GTM to begin with

The rest of this article will explain how you can set up enhanced conversion via Google Tag Manager ( GTM )


Setting Up Enhanced Conversions Using Google Tag Manager Guide

Step 1: Preparation

Firstly, we are going to go through and make sure we are eligible for enhanced conversions; the below list is all the requirements you will need to set up enhanced conversions

Pre-implementation Requirements:

  • Conversion Page – URL Identify the URL where the conversion tag will fire.
  • GTM is on the site – Make sure the code for GTM is in the source code of your site
  • First-Party Customer Data – Ensure there is at least 1 (The more the better) set of first-party customer data available on the page where your conversion tracking tag fires. This includes
  • Email: ( Recommended )
  • Phone Number: ( Recommended to provide it along with an email for optimal matching )
  • Address: ( If used, ensure you include first name, last name, postal code, and country. If any of these details are missing, do not include the address. )

Figure out which tag to use inside Google Tag Manager:

Before we begin, we must first figure out which tag we are going to pick to use inside tag manager, there are two options depending on where on the site the customer’s first-party data is collected.

1. Google Ads Conversion Tracking:

When to Use It: Use this option when the customer’s first-party data (like email or phone number) is collected on the same page where the conversion tag fires. This typically happens on a confirmation page where the user completes a purchase, on a form submission, or other conversion action, and their details are present on the same page.

2. User-Provided Data Tag:

When to Use It Use this option when the customer’s first-party data is collected on an earlier page (e.g., during the checkout or form fill stage), and the confirmation page (where the tag fires) doesn’t contain the customer’s data. This tag allows you to pass the previously collected data (from a prior page) when the confirmation page fires the tag.

This guide is going to be showing the set-up procedure for option 1 – Google Ads Conversion Tracking Tag

If you need option 2 installation, please follow this guide, which has the setup for Option 2 User-Provided Data Tag:

https://www.bowlerhat.co.uk/sop-user-provided-data-event-edition/

You want to end up with a list similar to this:

Conversion Type – Contact Form submission

URL –  https://www.example.com/page/

Tag Type – Google Ads Conversion Tracking Tag

First Party Data – Yes:

Email – Yes/No

Phone number – Yes/No

Address – All below must be yes to be valid

– First Name – Yes/No

– Last Name – Yes/No

– Post Code – Yes/No

– Country – Yes/No

Step 2: Configuring Google Ads For Enhanced Conversions

The next steps will show you how we set up the Google Ads account for enhanced conversions.

Google Ads Account Settings Config

  1. Goals > Settings
  2. Enhanced Conversions for Leads > Google Tag Manager.
  3. Enhanced Conversions > Google Tag Manager.

Preparing Our New Conversions Inside Google Ads

  1. Goals > Summary > Create Conversion Action.
  2. Select “Website” > Enter URL >
  3. Select ‘Google Ads only’ if it appears, as this option may show based on previous account settings. If it doesn’t appear, no action is needed.

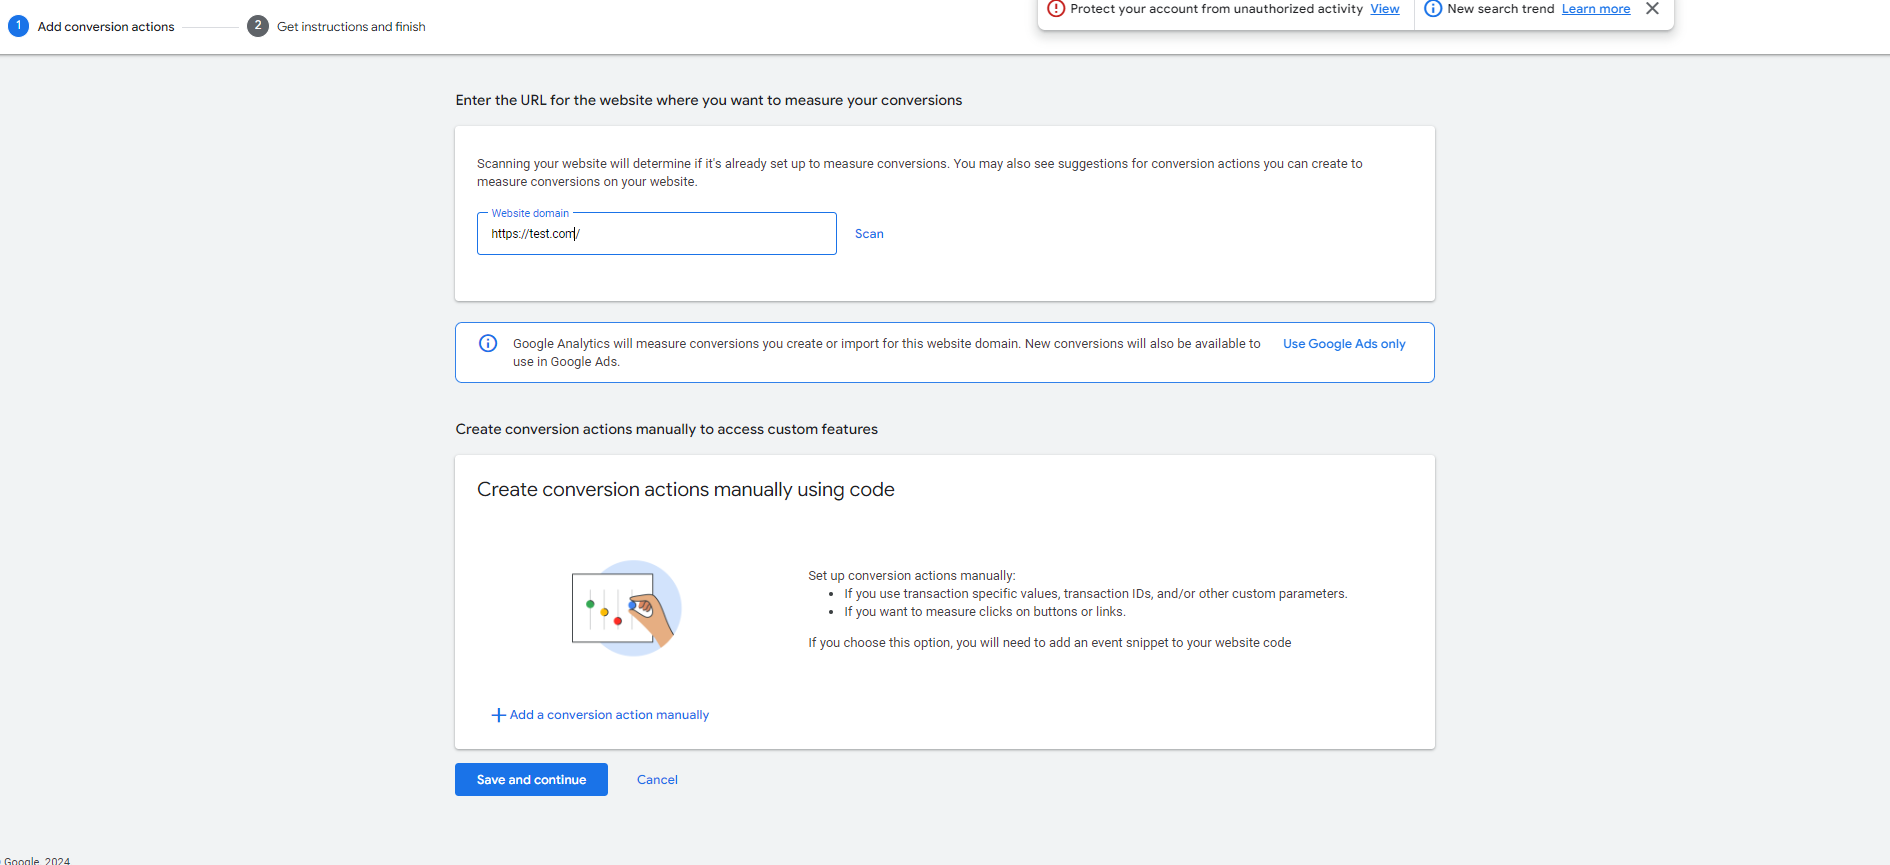
  4. Select “Add a conversion action manually.”
  5. Fill in details (ensure Enhanced Conversions via Tag Manager is enabled).
  6. For multiple actions, repeat steps 6-7.
  7. Save & continue.
  8. Use Google Tag Manager > Copy Conversion ID & Labels to Notepad.You should have something similar to this
    After this We are finished inside Google Ads, now we do the rest of the set-up inside Google tag Manager

Step 3: Setting Up Enhanced Conversions Inside Tag Manager

This guide is going to be showing the set-up procedure for option 1 – Google Ads Conversion Tracking Tag

If you are in need of option 2 installation, please follow this guide which has the setup for Option 2 User-Provided Data Tag: 

https://www.bowlerhat.co.uk/sop-user-provided-data-event-edition/

It is recommended to use Google Chrome to help with the setup

  1. Ensure a Conversion Linker Tag is present.
    • Make Sure – Enable linking on all page URLs is ticked
    • If not present, create one
    • New Tag > Conversion Linker > “Name the Tag Conversion Linker”
    • Enable linking on all page URLs
    • Trigger > All Pages
    • Save

2. Create a new tag:

    • Tag Type: Google Ads Conversion Tracking.
    • Name the tag: e.g., “Enhanced_Contact_Form.”
    • Enter Conversion ID & Label from previous step’s.
    • Save the tag ( We will return back later ).

3. Create a Trigger:

    • Name the trigger.
    • Trigger config > Form Submission > Some Forms.
    • Change “Click Classes” to “Page URL” > Equals/contains > paste the url your form is on
    • Save the trigger.

4. Determine customer data to track and go to URL:

    • Email (minimum), Email + Phone (recommended), or Email + Phone + Address   ( full package).
    • For address, First name, last name, postcode, and country are all required together, If any of these details are missing, do not include the address
    • Make sure the URL with the information on is open on another tab

5. Getting the CSS selector from your site:

    • ( We are doing the email address in the below example, the same process for the others )
    • Right-click the email field on the site > Inspect > To bring up the dev tools
    • Right-click on the pre-highlighted text and click Copy > Copy selector.
    • Paste inside a note document or anywhere you can store ( You’re not allowed to paste for the next step on google chrome )
    • Inside the Chrome Dev Tools click the console tab
    • Test the selector by typing : document.querySelector(‘CHANGE TO YOUR SELECTOR‘).value
    • Confirm it works by checking the returned email after entering it.

6. Go to Tag Manager > Variables:

    • Name the variable “Email”
    • Create new user-defined variables > Custom JavaScript.
Paste this code:
function(){

return document.querySelector(‘CHANGE TO YOUR SELECTOR‘).value

}
  • Repeat for Phone and Address ( if available, if not skip to next ).

7. Go back to the saved tag:

    • Tick “Include user-provided data from your website.”
    • Create a new variable, name it e.g., “Enhanced Manual.”
    • Match parameters to the variables we just created.
    • Add the trigger we created before

Testing

  1. Preview your site in tag manager
  2. In the debug window fill in the form and submit
  3. Check the tag assistant screen and find where the conversion took place
  4. Click values
  5. Scroll down to find the parameters we made
  6. The Value should match the data you provided
  7. If it is, it all works good job

Not Working? Common Problems and How to Fix Them

1. No Form Submission Event Detected

It’s common to encounter situations where, after a form is submitted, Google Tag Manager (GTM) doesn’t detect the submission, preventing the trigger from firing correctly.

Example

One frequent issue is with Elementor forms, which often do not generate an event in Google Tag Manager. If you’re using an Elementor form on your site, this could be why the form submission isn’t triggering the event.

Our Recommended Solution

  • To resolve this issue, you will need help from your developers to ensure the form submission event is pushed to the GTM data layer. They can add the following code to trigger the event whenever the form is successfully submitted:
<script>

window.dataLayer.push({

‘event’ : ‘formSubmit.Success’

})

</script>
    • Alternatively, if this issue persists, consider switching to Contact Form 7, which has built-in support for Google Tag Manager. You can find more details and download it here: Contact Form 7.

2. Form Embedded in an iFrame

Another common challenge is when the form is embedded on your website using an iFrame. Since an iFrame is technically a separate window embedded on your site, GTM is unable to track activity inside it. Think of an iFrame as a “black hole” for GTM—it cannot detect events happening within it.

How to Check if Your Form is an iFrame:

  • Right-click on the form and inspect it.
  • Look for the option to “View Frame Source” or check the HTML structure for an <iframe> tag.

Our Recommended Solution

iFrames are tricky because they essentially act as independent websites.

There are two main options for resolving this issue:

  • Contact the iFrame provider (the external site that hosts the form) and request that they insert your Google Tag Manager code within the embedded form. This would allow GTM to track form submissions within the iFrame.
  • Consult your web developers to see if it’s possible to replace the iFrame with a form that resides directly on your website. This would give you full control over tracking and eliminate the issue.

Remember that both solutions may require collaboration with external teams and could involve some pushback, as these changes might not be straightforward. However, it’s worth pursuing if accurate conversion tracking is essential for your business.

Summary

Still with us? Congratulations – this is tricky!

As you can see, setting up enhanced conversions is complicated, fiddly and often impacted by technical choices on the target website.

However, enhanced conversions replace lost data and improve results from modern Google Ads campaigns, so they are essential in 2024 and beyond.

Our goal here is to create the most comprehensive tutorial for Enhanced Conversions online so if you have any input or there is something you feel we have not covered please let us know!

If you are struggling or have any questions, just email us—we are always happy to help!

Get in touch.

Facebook
Twitter
LinkedIn
Pinterest

Leave a Reply

Your email address will not be published. Required fields are marked *

Free PPC Audit

Get in touch with Marcus Miller to learn how to generate more traffic, leads and sales.

1. Review your current marketing
2. Identify your key opportunities
3. How to improve results & cut costs!

Put over 20 years of marketing experience to work for your business today.